Categories
Eclipse

Complete EclipseCon 2013 M2M tutorial and take home some Open Hardware!Complete EclipseCon 2013 M2M tutorial and take home some Open Hardware!

EclipseCon is in about a month, and we are so excited about what’s cooking for M2M this year!
Today, we contributed Mihini source code, after an initial review that took longer than what we initally planned, and EclipseCon in Boston will be the first opportunity for you to get a real deep dive into the Eclipse Koneki and Mihini projects.

Over the last few months, we have been working on putting together a nice setup showcasing the software components we are developing for doing M2M at Eclipse, and if you join our tutorial, you will have a chance to recreate something very similar by yourself (minus the actual greenhouse…)!

What is even cooler, is that you’ll get to leave the session with the very same hardware you’ll have hacked with during three hours! That is:

  • a fully functional Raspberry Pi, with its SD card and a Wi-Fi dongle,
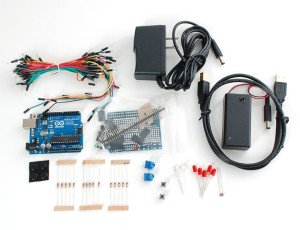
  • an Arduino Uno, with different kind of sensors (light sensor, push buttons, potentiometers) and actuators (LEDs, ), …

Raspberry PiArduino kit

Why is it cool?

Well, first, you willl leave the tutorial with a fully functional code allowing you to interact with physical sensors, making their values available on the Internet for you to just use it.
Then, all this hardware you’ll get, is highly repurposable. The Raspberry Pi, for example, is a pretty powerful Linux board that can act as a media-center, a VoIP server, a web server, etc. The Arduino is a prototyping platform that can be extended in many ways, and the kit you’ll have can be the initial seed for your next DIY project!

What do I have to do?

If you are already registered for EclipseCon, you will soon receive an e-mail for changing your reservation and paying the extra amount of money for getting the hardware. If you are not, then make sure to indicate whether or not you want to pay for the hardware when you register to the conference and tutorial. Please make sure to place your order before March 13!
Note that buying a kit is absolutely not a prerequisite, and we will lend you one for the duration of the tutorial if you didn’t want or didn’t have time to order one for yourself.

Finally, if you are already in Boston on Sunday, 24th, we will welcome you at the Code Sprint session if you feel like you want to hack with us and have a sneak peek at the tutorial!

Photo Credit: Digital Sextant via Compfight cc

EclipseCon is in about a month, and we are so excited about what’s cooking for M2M this year!
Today, we contributed Mihini source code, after an initial review that took longer than what we initally planned, and EclipseCon in Boston will be the first opportunity for you to get a real deep dive into the Eclipse Koneki and Mihini projects.

Over the last few months, we have been working on putting together a nice setup showcasing the software components we are developing for doing M2M at Eclipse, and if you join our tutorial, you will have a chance to recreate something very similar by yourself (minus the actual greenhouse…)!

What is even cooler, is that you’ll get to leave the session with the very same hardware you’ll have hacked with during three hours! That is:

  • a fully functional Raspberry Pi, with its SD card and a Wi-Fi dongle,
  • an Arduino Uno, with different kind of sensors (light sensor, push buttons, potentiometers) and actuators (LEDs, ), …

Raspberry PiArduino kit

Why is it cool?

Well, first, you willl leave the tutorial with a fully functional code allowing you to interact with physical sensors, making their values available on the Internet for you to just use it.
Then, all this hardware you’ll get, is highly repurposable. The Raspberry Pi, for example, is a pretty powerful Linux board that can act as a media-center, a VoIP server, a web server, etc. The Arduino is a prototyping platform that can be extended in many ways, and the kit you’ll have can be the initial seed for your next DIY project!

What do I have to do?

If you are already registered for EclipseCon, you will soon receive an e-mail for changing your reservation and paying the extra amount of money for getting the hardware. If you are not, then make sure to indicate whether or not you want to pay for the hardware when you register to the conference and tutorial. Please make sure to place your order before March 13!
Note that buying a kit is absolutely not a prerequisite, and we will lend you one for the duration of the tutorial if you didn’t want or didn’t have time to order one for yourself.

Finally, if you are already in Boston on Sunday, 24th, we will welcome you at the Code Sprint session if you feel like you want to hack with us and have a sneak peek at the tutorial!

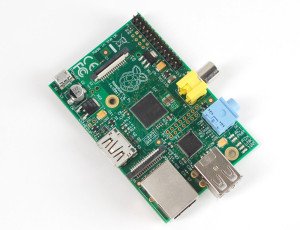
Photo Credit: Digital Sextant via Compfight cc

Categories
Eclipse

Upcoming M2M webinars series

Did you register for the upcoming M2M (Machine-to-Machine) webinars series?

In the next few weeks there will be four webinars to give you not only a general introduction to what Machine-to-Machine is, but also highlight how actors of the Eclipse community are working on addressing the challenges associated with M2M technologies.
The M2M initiative at Eclipse is at the crossroads of complex industrial use cases, bleeding-edge technologies, and opportunities to get people from the DIY/Maker movement on-board, opening the door to even more innovation and yet to be invented solutions!

There really are very cool technologies being developed at the moment: on the protocol front we provide client libraries and simulators for protocols such as OMA-DM and MQTT, tools include a complete environment to develop Lua applications, and in the next couple months the Mihini project will deliver a full-blown embedded framework for M2M that will make it very easy to connect any Linux-capable device to the Internet of Things.

The first webinar is tomorrow, Thursday 13th, and will give you more insight on what M2M is, and what are the projects at Eclipse that already allow you to develop M2M solutions! Register now!


Did you register for the upcoming M2M (Machine-to-Machine) webinars series?

In the next few weeks there will be four webinars to give you not only a general introduction to what Machine-to-Machine is, but also highlight how actors of the Eclipse community are working on addressing the challenges associated with M2M technologies.
The M2M initiative at Eclipse is at the crossroads of complex industrial use cases, bleeding-edge technologies, and opportunities to get people from the DIY/Maker movement on-board, opening the door to even more innovation and yet to be invented solutions.

There really are very cool technologies being developed at the moment: on the protocol front we provide client libraries and simulators for protocols such as OMA-DM and MQTT, tools include a complete environment to develop Lua applications, and in the next couple months the Mihini project will deliver a full-blown embedded framework for M2M that will make it very easy to connect any Linux-capable device to the Internet of Things.

The first webinar is tomorrow, Thursday 13th, and will give you more insight on what M2M is, and what are the projects at Eclipse that already allow you to develop M2M solutions. Register now!


Categories
Eclipse

Support for Lua interpreters in Koneki LDT 0.9M1Support for Lua interpreters in Koneki LDT 0.9M1

Koneki released its 0.8 version with Juno, and we plan on graduating with a 1.0 version for Kepler.
In order to stabilize our API and improve the overall quality of the product, we thought it would be better if we released a 0.9 in-between.
This 0.9 version is scheduled for the end of this year, and we just released the first milestone!

We’ve resolved over 30 (!) bugs, and the most notable feature that we added is the support for Lua interpreters in Lua Development Tools.
In 0.8, when one wanted to launch a script, it had to be done either from the command line or using an “External Tools” launch configuration.

But as of 0.9M1, it is possible to declare in the IDE the Lua interpreter(s) that are installed in your machine, and then use them for launching your Lua applications directly from Eclipse, using good ol’ Launch configurations.

Launch Lua script

More importantly, you might remember how cumbersome it was in 0.8 to debug a script. You add to first open a debugging server in the IDE, and then launch your script by appending a few lines at its beginning so as to instrument it with a debug client. It was a frustrating and error-prone process where you could forget to launch the debug server prior to launching the script, or struggle to get the debug client setup right…

Well guess what, we now also provide Debug Configurations! All the steps needed to get the debugger working are now automagically taken care of for you, making debug literally a one-click operation (F11 FTW!). Note that you still need to have luasocket installed.

Debug Lua script

Please also note that if you are on OSX, there is a slight bug that you will need to workaround until M2 is available. For obscure reasons, the environment variables available from Eclipse do not reflect the environment variables available from a regular shell.
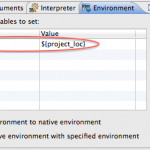
In particular, the debugger relies on the PWD variable, that you will have to set manually to ${project_loc} in the “Environment” tab of the Debug Configuration dialog.

Have a look at the complete New & Noteworthy and use the following update site http://download.eclipse.org/koneki/releases/milestones if you want to give this milestone a whirl!

 Koneki released its 0.8 version with Juno, and we plan on graduating with a 1.0 version for Kepler.
In order to stabilize our API and improve the overall quality of the product, we thought it would be better if we released a 0.9 in-between.
This 0.9 version is scheduled for the end of this year, and we just released the first milestone!

We’ve resolved over 30 (!) bugs, and the most notable feature that we added is the support for Lua interpreters in Lua Development Tools.
In 0.8, when one wanted to launch a script, it had to be done either from the command line or using an “External Tools” launch configuration.

But as of 0.9M1, it is possible to declare in the IDE the Lua interpreter(s) that are installed in your machine, and then use them for launching your Lua applications directly from Eclipse, using good ol’ Launch configurations.

Launch Lua script

More importantly, you might remember how cumbersome it was in 0.8 to debug a script. You add to first open a debugging server in the IDE, and then launch your script by appending a few lines at its beginning so as to instrument it with a debug client. It was a frustrating and error-prone process where you could forget to launch the debug server prior to launching the script, or struggle to get the debug client setup right…

Well guess what, we now also provide Debug Configurations! All the steps needed to get the debugger working are now automagically taken care of for you, making debug literally a one-click operation (F11 FTW!). Note that you still need to have luasocket installed.

Debug Lua script

Please also note that if you are on OSX, there is a slight bug that you will need to workaround until M2 is available. For obscure reasons, the environment variables available from Eclipse do not reflect the environment variables available from a regular shell.
In particular, the debugger relies on the PWD variable, that you will have to set manually to ${project_loc} in the “Environment” tab of the Debug Configuration dialog.

Have a look at the complete New & Noteworthy and use the following update site http://download.eclipse.org/koneki/releases/milestones if you want to give this milestone a whirl!