Categories
Eclipse IoT

Using MQTT and Eclipse Paho in Android Things

A couple of days ago, Google announced that they were essentially rebranding Brillo to Android Things (I do love that name, by the way!), and finally opening it for a Developer Preview.

There are a few things I already like very much in Android Things:

  • It is already supported on Intel EdisonNXP Pico and Raspberry Pi 3, and there are ready to use filesystem images that you can just flash to get going with Android Things in just minutes.
  • The Rainbow HAT sensor kit that’s available for Raspberry Pi is very cool, and includes a 4-digit LED display, 7 RGB LEDs, a temperature and barometric sensor, a piezzo buzzer for basic PWM-based audio, and three capacitive touch buttons. Sparkfun has a kit that’s targeting the Edison, while Adafruit’s kit is general purpose and meant for breadboard enthusiasts.
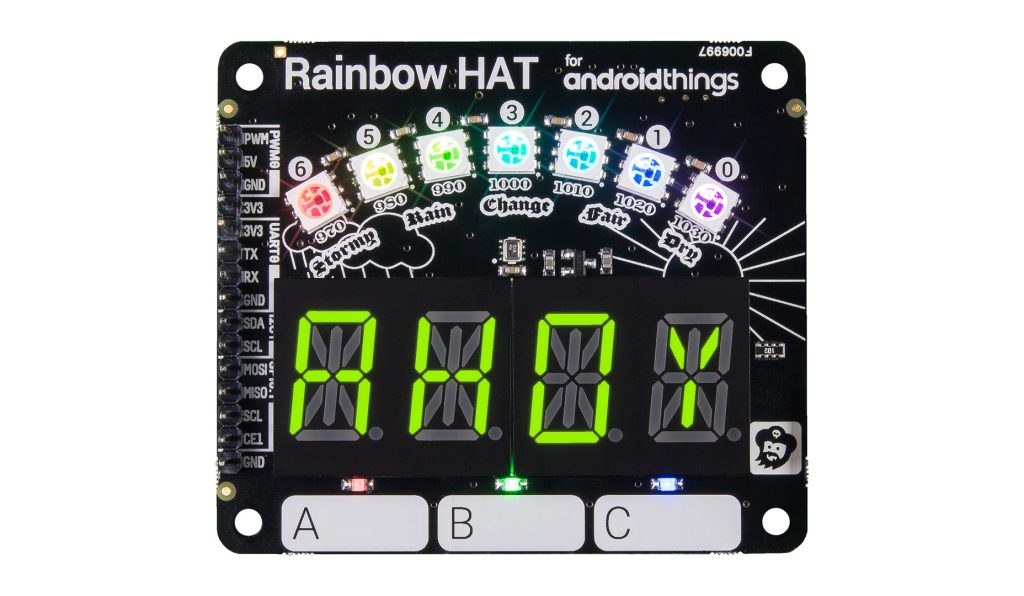
Rainbow HAT for Raspberry Pi (Photo credit: Pimoroni)
  • Anyone who’s tried to manipulate low-level peripherals using Java will be pretty happy to see that Android Things’ Peripheral I/O APIs provide nice wrappers for GPIOsPWMI2CSPI and UART.
  • Implementing IoT sensor drivers taps into the existing sensor framework you may already be familiar with if you’ve already tried to access the gyroscope or light sensor of an Android device in your app, and the same SensorManager API you’re already used to can be used with your new devices (for which a driver may already exist, and if not adding a new one does not seem overly complex)
  • Finding good development tools for building IoT solutions is always a challenge. It’s great to be able to leverage the Android SDK tools and Android Studio for things like device emulation, debugging, etc.

I just received my Rainbow HAT today and thought I would use the opportunity to do a quick tutorial on how to use MQTT with Android Things, using Eclipse Paho. What’s more, I’ll also show you a cool feature in mqtt-spy that will allow us to easily display the live temperature on a chart.

I used the Weather Station example from Android Things as a starting point, as it is already including code to publish data to the cloud using Google Pub/Sub. My fork is available on Github, and as you can see the changes to the original example are very limited!

Check out the video, and let me know if you have any questions!
Categories
Eclipse IoT

How to run your web server and MQTT WebSockets broker on the same port

I was just asked how one can deploy a similar setup as the iot.eclipse.org MQTT sandbox, where MQTT over WebSockets is available on port 80, just like the rest of the website.

There are actually two ways of achieving this.

Mosquitto as the main frontend

It’s a little-known fact but together with built-in WebSockets support (added in version 1.4), Mosquitto also can act as basic HTTP server, and directly serve a bunch of static resources for you. The config option you’re looking for is “http_dir“, that will allow you to serve the content of a directory over HTTP.

Granted you are running a version of Mosquitto that has WebSockets support, here how your mosquitto.conf file should look like to enable WebSockets *and* regular HTTP connections:

listener 80
protocol websockets
http_dir /home/johndoe/htdocs

Of course, you will need to make sure that you do not have any other daemons (like Apache, nginx, …) already running and using port 80 🙂

Once Mosquitto is setup this way, you can use any MQTT client that supports WebSockets to connect to ws://yourhost URI.

[info]ws://yourhost/ws, or ws://yourhost:80/foobar would work just fine too – Mosquitto doesn’t care about the path at all![/info]

Apache front-end + mod_websocket_mosquitto

Since it’s likely you actually want a “real” HTTP server to serve your website (for security reasons, for being able to run PHP, etc.), another approach is to use Apache as the main HTTP front-end, as you would normally do, and configure it to tunnel WebSockets connections made on a given URI to your Mosquitto broker.

You can download an Apache module that does exactly that at https://github.com/willem4ever/mod_websocket_mosquitto. The instructions to compile and install it are pretty straightforward and you will end up with something like the following in your Apache configuration:

<IfModule mod_websocket.c>
Loadmodule mod_websocket_mosquitto /usr/lib/apache2/modules/mod_websocket_mosquitto.so
 <Location /mosquitto>
 MosBroker localhost
 MosPort 1883
 SetHandler websocket-handler
 WebSocketHandler /usr/lib/apache2/modules/mod_websocket_mosquitto.so mosquitto_init
 </Location>
</IfModule>
Categories
Eclipse IoT Non classé

Running Eclipse Mosquitto on Snappy Ubuntu Core

I’ve recently been playing around with Snappy Ubuntu Core, and I thought it would be a nice exercise to try and package Mosquitto as a so-called “Snap”.

This blog post will give you a quick introduction to Snappy, and what it means to have a technology like Mosquitto available as a snap package.

Snappy Ubuntu Core

snappy

Ubuntu Core is a minimal Ubuntu distribution, that doesn’t come with the classical, APT-based, package manager.
Ubuntu Core is targeting cloud & IoT environments, therefore it is using an approach where the applications or services that one installs in a given distro, are self-contained “snaps”, that are completely isolated from the rest of the environment. If a snap depends on a shared library, this library will be bundled with the snap. If a snap needs to be granted rights beyond the scope of their default sandboxed container, it will be specified in the snap metadata. And so on.

Why does it matter for the Internet of Things?

Being able to transactionally update a system definitely makes sense for cloud environments, but it is also key for Internet of Things solutions. Even more so if you take into account how easy it is to fire up a new EC2 machine for a system you just crashed, vs. actually going on the field to troubleshoot an IoT gateway that went off the network after a failed update…

Furthermore, IoT gateways today are operating a very limited set of services, since there’s no clean and safe way to really turn them into extensible platforms, where any partner involved in developing a given solution would be able to run its own bits, in dedicated sandboxes. Application frameworks like Kura certainly enable such things at the application level, but we need solutions like Ubuntu Core for anything closer to the system.

Mosquitto on Snappy Ubuntu Core

If you have ever played with MQTT, there’s a good chance that you have used Eclipse Mosquitto as your broker. It is a very customizable, feature-packed, broker that has recently added support for MQTT over WebSockets. Mosquitto is available in source form, but it is also distributed in binary form and as a ready-to-use package in many Linux distros.

The Mosquitto Snappy package contains a WebSockets-ready version of Mosquitto 1.4.2 that can run on x64 or ARM architectures. Therefore, you are literally 2 minutes away from having an up-and-running Mosquitto broker on Microsoft Azure, Amazon EC2, or Google Compute Engine. Since Ubuntu Core is also available for the Raspberry Pi and the BeagleBone Black, you can install Mosquitto on those platform as well.

If you want to try it yourself on EC2, for example, you can follow this tutorial to bootstrap your Ubuntu Core image. Once you have a shell access to your Core server, simply run sudo snappy install mosquitto.kartben, and Mosquitto will be automatically downloaded from the Ubuntu Software Store, and installed. WebSockets are enabled on port 8080 and as a matter of fact, I have also packaged a few extra resources with the broker to help you get started: if you open http://{myubuntucoreIP}:8080 in your browser, you will be granted with a web page that helps making sure you use the right connection settings, and also with a live visualization of your topics’ activity.

screenshot