There is something oddly fascinating about radio waves, radio communications, and the sheer amount of innovations they’ve enabled since the end of the 19th century.
What I find even more fascinating is that it is now very easy for anyone to get hands-on experience with radio technologies such as LPWAN (Low-Power Wide Area Network, a technology that allows connecting pieces of equipment over a low-power, long-range, secure radio network) in the context of building connected products.

“It’s of no use whatsoever […] this is just an experiment that proves Maestro Maxwell was right—we just have these mysterious electromagnetic waves that we cannot see with the naked eye. But they are there.“
— Heinrich Hertz, about the practical importance of his radio wave experiments
Nowadays, not only is there a wide variety of hardware developer kits, gateways, and radio modules to help you with the hardware/radio aspect of LPWAN radio communications, but there is also open-source software that allows you to build and operate your very own network. Read on as I will be giving you some insights into what it takes to set up a full-blown LoRaWAN network server in the cloud!
A quick refresher on LoRaWAN
LoRaWAN is a low-power wide-area network (LPWAN) technology that uses the LoRa radio protocol to allow long-range transmissions between IoT devices and the Internet. LoRa itself uses a form of chirp spread spectrum modulation which, combined with error correction techniques, allows for very high link budgets—in other terms: the ability to cover very long ranges!
Data sent by LoRaWAN end devices gets picked up by gateways nearby and is then routed to a so-called network server. The network server de-duplicates packets (several gateways may have “seen” and forwarded the same radio packet), performs security checks, and eventually routes the information to its actual destination, i.e. the application the devices are sending data to.
LoRaWAN end nodes are usually pretty “dumb”, battery-powered, devices (ex. soil moisture sensor, parking occupancy, …), that have very limited knowledge of their radio environment. For example, a node may be in close proximity to a gateway, and yet transmit radio packets with much more transmission power than necessary, wasting precious battery energy in the process. Therefore, one of the duties of a LoRaWAN network server is to consolidate various metrics collected from the field gateways to optimize the network. If a gateway is telling the network server it is getting a really strong signal from a sensor, it might make sense to send a downlink packet to that device so that it can try using slightly less power for future transmissions.
As LoRa uses an unlicensed spectrum and granted one follows their local radio regulations, anyone can freely connect LoRa devices, or even operate their own network.
My private LoRaWAN server, why?
The LoRaWAN specification puts a really strong focus on security, and by no means do I want to make you think that rolling out your own networking infrastructure is mandatory to make your LoRaWAN solution secure. In fact, LoRaWAN has a pretty elegant way of securing communications, while keeping the protocol lightweight. There is a lot of literature on the topic that I encourage you to read but, in a nutshell, the protocol makes it almost impossible for malicious actors to impersonate your devices (messages are signed and protected against replay attacks) or access your data (your application data is seen by the network server as an opaque, ciphered, payload).
So why should you bother about rolling your ow LoRaWAN network server anyway?
Coverage where you need it
In most cases, relying on a public network operator means being dependant on their coverage. While some operators might allow a hybrid model where you can attach your own gateways to their network, and hence extend the coverage right where you need it, oftentimes you don’t get to decide how well a particular geographical area will be covered by a given operator.
When rolling out your own network server, you end up managing your own fleet of gateways, bringing you more flexibility in terms of coverage, network redundancy, etc.
Data ownership
While operating your own server will not necessarily add a lot in terms of pure security (after all, your LoRaWAN packets are hanging in the open air a good chunk of their lifetime anyway!), being your own operator definitely brings you more flexibility to know and control what happens to your data once it’s reached the Internet.
What about the downsides?

It goes without saying that operating your network is no small feat, and you should obviously do your due diligence with regards to the potential challenges, risks, and costs associated with keeping your network up and running.
Anyway, it is now high time I tell you how you’d go about rolling out your own LoRaWAN network, right?
The Things Stack on Azure
The Things Stack is an open-source LoRaWAN network server that supports all versions of the LoRaWAN specification and operation modes. It is actively being maintained by The Things Industries and is the underlying core of their commercial offerings.
A typical/minimal deployment of The Things Stack network server relies on roughly three pillars:
- A Redis in-memory data store for supporting the operation of the network ;
- An SQL database (PostgreSQL or CockroachDB are supported) for storing information regarding the gateways, devices, and users of thje network ;
- The actual stack, running the different services that power the web console, the network server itself, etc.
The deployment model recommended for someone interested in quickly testing out The Things Stack is to use their Docker Compose configuration. It fires up all the services mentioned above as Docker containers on the same machine. Pretty cool for testing, but not so much for a production environment: who is going to keep those Redis and PostgreSQL services available 24/7, properly backed up, etc.?
I have put together a set of instructions and a deployment template that aim at showing how a LoRaWAN server based on The Things Stack and running in Azure could look like.
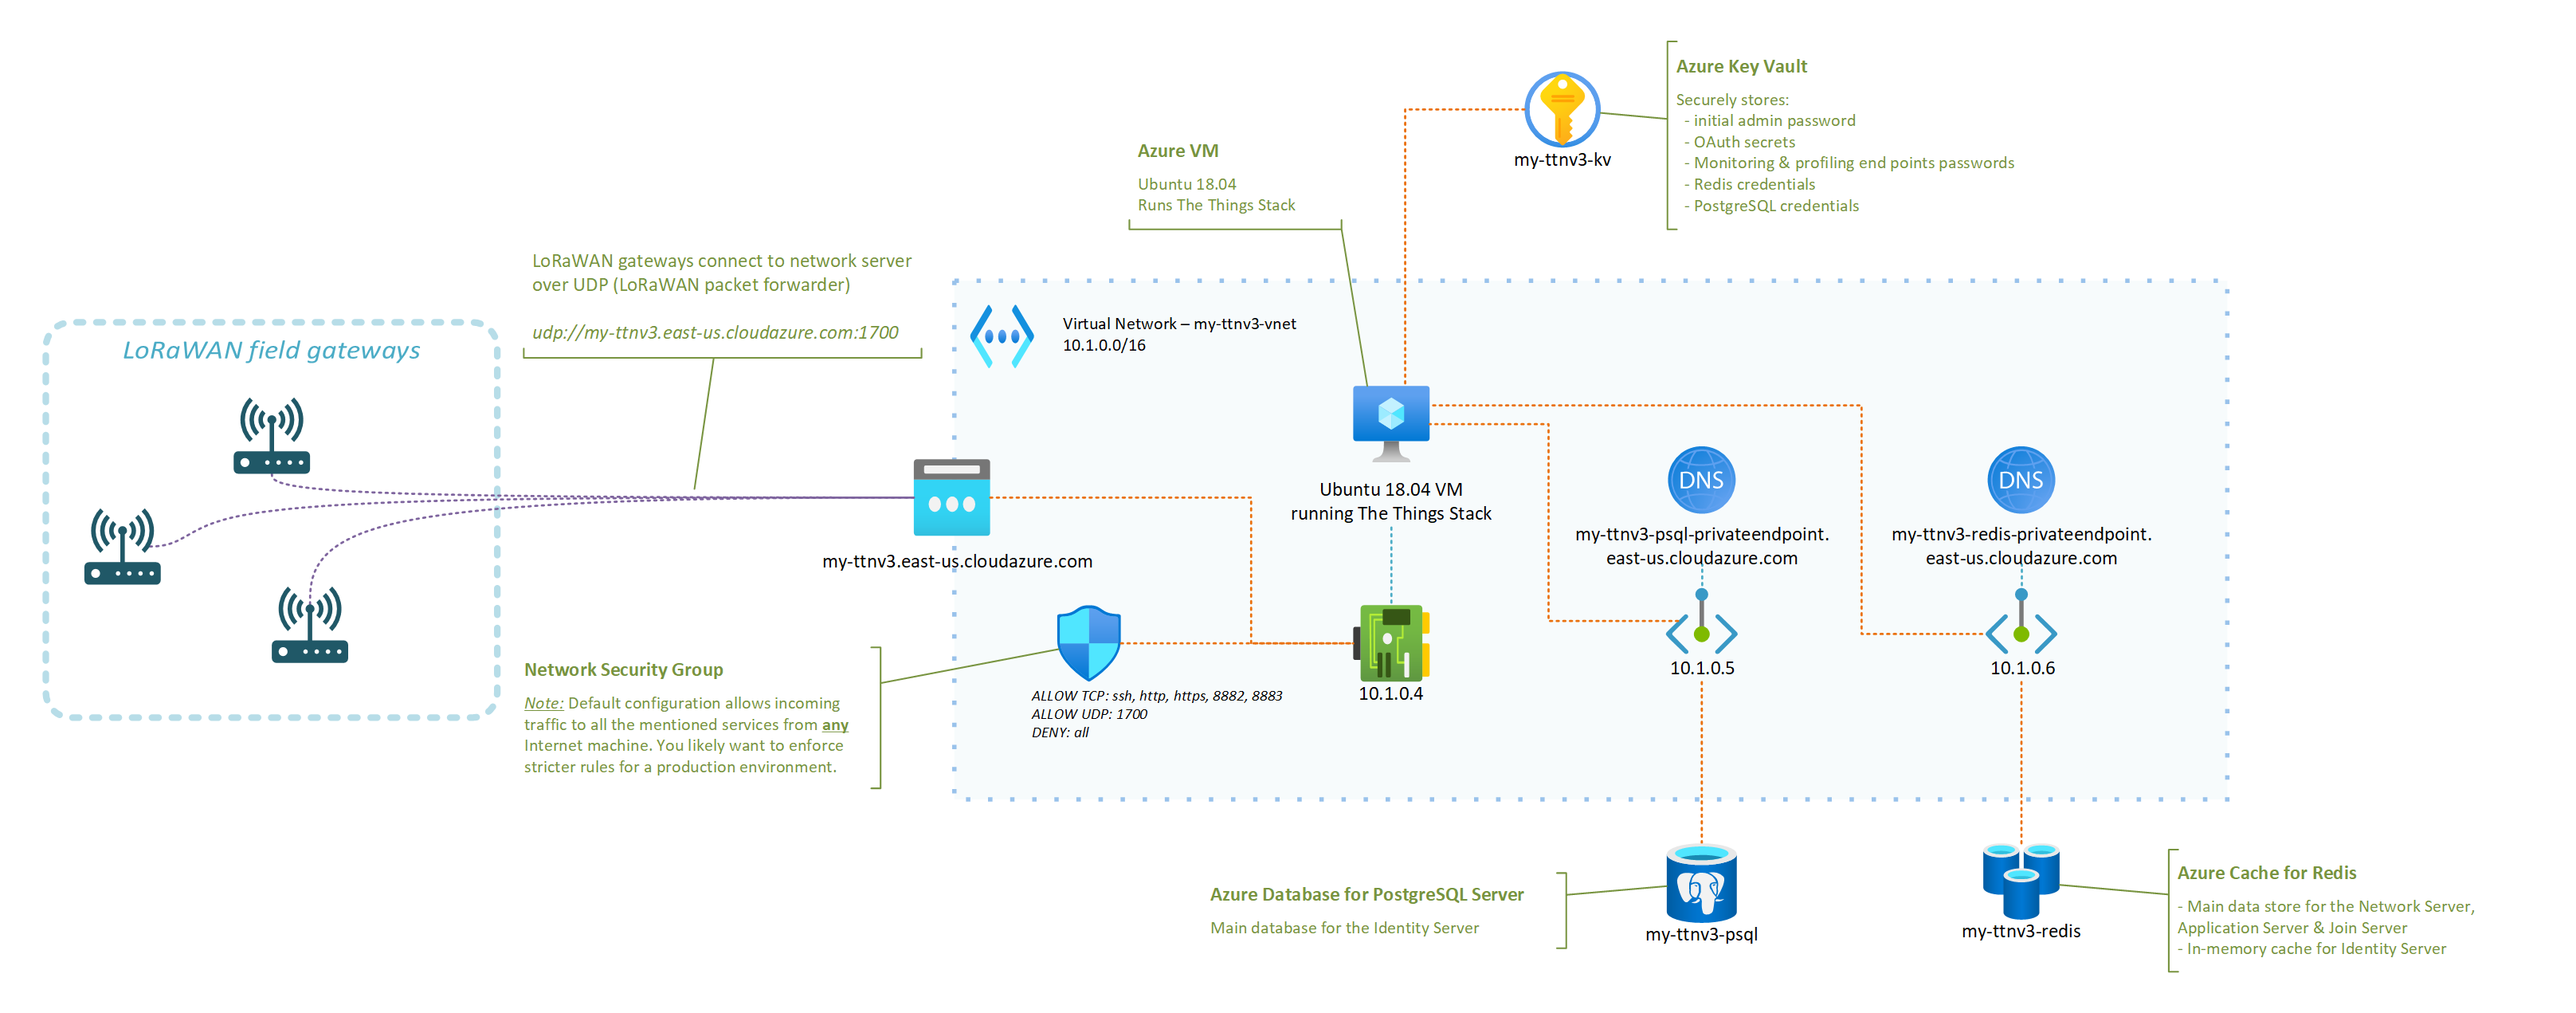
The instructions in the GitHub repository linked below should be all you need to get your very own server up and running!
In fact, you only have a handful of parameters to tweak (what fancy nickname to give your server, credentials for the admin user, …) and the deployment template will do the rest!

OK, I deployed my network server in Azure, now what?
Just to enumerate a few, here are some of the things that having your own network server, running in your own Azure subscription, will enable. Some will sound oddly specific if you don’t have a lot of experience with LoRaWAN yet, but they are important nevertheless. You can:
- benefit from managed Redis and PostgreSQL services, and not have to worry about potential security fixes that would need to be rolled out, or about performing regular backups, etc. ;
- control what LoRaWAN gateways can connect to your network server, as you can tweak your Network Security Group to only allow specific IPs to connect to the UDP packet forwarder endpoint of your network server ;
- completely isolate the internals of your network server from the public Internet (including the Application Server if you which so), putting you in a better position to control and secure your business data ;
- scale your infrastructure up or down as the size and complexity of the fleet that you are managing evolves ;
- … and there is probably so much more. I’m actually curious to hear in the comments below about other benefits (or downsides, for that matter) you’d see.
I started to put together an FAQ in the GitHub repository so, hopefully, your most obvious questions are already answered there. However, there is one that I thought was worth calling out in this post, which is: “How big of a fleet can I connect?“.
It turns out that even a reasonably small VM like the one used in the deployment template—2 vCPUs, 4GB of RAM—can already handle thousands of nodes, and hundreds of gateways. You may find this LoRaWAN traffic simulation tool that I wrote helpful in case you’d want to conduct your own stress testing experiments.
What’s next?
You should definitely expect more from me when it comes to other LoRaWAN related articles in the future. From leveraging DTDL for simplifying end application development and interoperability with other solutions, to integrating with Azure IoT services, there’s definitely a lot more to cover. Stay tuned, and please let me know in the comments of other related topics you’d like to see covered!
If you enjoyed this article, don’t forget to subscribe to this blog to be notified of upcoming publications! And of course, you can also always find me on Twitter and Mastodon.